


Paint defects happen to everyone. Even the best painters in the cleanest booths occasionally pull a car out and find a fish eye, a run, or solvent pop staring back at them. The difference between a seasoned painter and a frustrated one isn't that defects never happen — it's knowing exactly what caused the problem, how to fix it efficiently, and how to prevent it next time.
This guide covers the most common paint defects you'll encounter in collision repair, organized by what you're actually seeing on the panel.
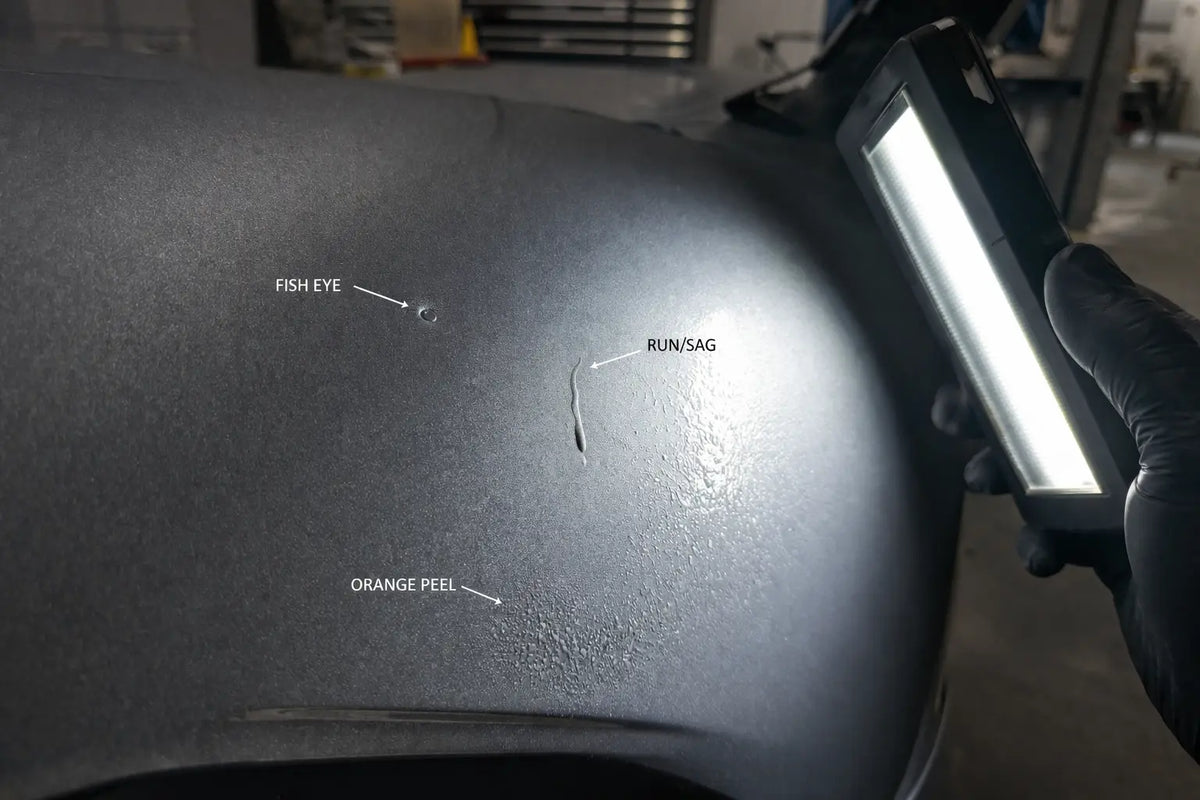
Fish Eyes (Silicone Contamination Craters)
What it looks like
Small round craters in the paint film, typically 1/8 to 1/2 inch in diameter, where the paint pulls away from a spot on the surface. They look like tiny volcanoes — a raised ring with a depression in the center where the substrate or previous coat is visible.
What causes it
Silicone contamination. This is the cause in over 90% of fish eye cases. Silicone comes from wax, polish, tire dressing, hand lotion, detailing sprays, and even certain shop rags washed with fabric softener. It only takes a microscopic amount of silicone on the surface to cause fish eyes across an entire panel. Silicone is extremely difficult to remove because it migrates — it spreads across surfaces and can even become airborne in the shop.
How to fix it
If you catch fish eyes while the coat is still wet, you have two options. First, you can add a fish eye eliminator additive (like SEM Fish Eye Eliminator) to your paint mix and recoat immediately — the additive lowers the surface tension of the paint so it flows over the contamination instead of pulling away. Second, if the fish eyes are severe, let the coat flash, scuff with 800-grit, re-clean thoroughly with wax and grease remover, and reshoot.
If the fish eyes are in cured clear coat, sand the affected area with 800-grit, re-clean with wax and grease remover using the two-rag method (wet rag followed immediately by a dry rag before the solvent evaporates), and recoat.
How to prevent it
- Always perform a thorough wax and grease removal as the very first step — before any sanding. Sanding over silicone grinds it into the substrate.
- Use the two-rag method: wipe with a soaked rag, then immediately wipe dry with a clean rag before the solvent evaporates and redeposits the contaminant.
- Ban silicone-based products from the shop entirely — no spray detailers, no tire shine, no silicone lubricants anywhere near the paint area.
- Wear clean nitrile gloves. Hand lotion and skin oils contain silicone.
Runs and Sags
What it looks like
A run is a narrow drip line where excess paint flows downward. A sag is a wider area where a thick section of paint slumps, creating a curtain-like droop. Both indicate too much material was applied in one area.
What causes it
Too much material, too close, too slow, or too cold. Specifically: holding the gun too close to the surface, moving too slowly across the panel, applying too many wet coats without adequate flash time, fluid delivery set too high, or spraying in a booth that's below the paint manufacturer's minimum temperature (which slows solvent evaporation and keeps the film wet longer).
How to fix it
Let the run cure fully — don't try to fix it while wet. Once cured, shave the bulk of the run down with a single-edge razor blade held at a low angle. Be gentle — you're leveling the high point, not cutting into the panel. After leveling, wet sand starting at 1000 or 1500 grit, work through 2000 and 3000, then compound and polish with 3M Perfect-It to restore gloss. For small sags in clear coat, you can often skip the razor and go straight to 1000-grit wet sanding.
How to prevent it
- Maintain 6–8 inches spray distance consistently across the entire pass.
- Keep your gun speed steady — don't slow down at panel edges or corners.
- Allow proper flash time between coats (check the TDS for your specific product).
- Reduce fluid delivery for vertical surfaces and edges where gravity works against you.
- Make sure the booth is at the paint manufacturer's recommended temperature before spraying.
Orange Peel
What it looks like
A textured surface that resembles the skin of an orange — bumpy, with peaks and valleys visible under side lighting. Some orange peel is normal in production refinishing, but excessive texture indicates a problem with atomization or application.
What causes it
Poor atomization is the primary cause. This happens when air pressure is too low for the material viscosity, the gun is held too far from the surface (material partially dries in flight), the reducer is too fast for the booth temperature (solvent flashes before the paint can flow out), or the material wasn't reduced properly and is too thick.
How to fix it
Orange peel in cured clear coat is one of the easier defects to correct. Wet sand with the appropriate grit progression — 1500 through 3000 for moderate peel, 2000 through 3000 for light peel — then compound and polish. 3M Trizact P3000 on a DA sander with water mist is the fastest method for panel-wide orange peel removal. Follow with 3M Perfect-It Rubbing Compound, then Machine Polish.
How to prevent it
- Verify air pressure at the gun cap with the trigger pulled — not at the wall regulator.
- Use the correct reducer speed for your booth temperature (slow reducer in warm booths, fast reducer in cool booths — counterintuitive but correct, since you want the reducer to keep the paint wet long enough to flow).
- Maintain proper spray distance — 6 to 8 inches for HVLP.
- Ensure material is mixed and reduced per the TDS. Strain through a paint strainer into the cup.
Solvent Pop
What it looks like
Tiny pinholes or small craters in the paint surface, often clustered. They look like the surface was poked with a pin. Sometimes they're visible only under magnification or at certain angles. Solvent pop can occur in primer, base coat, or clear coat.
What causes it
Trapped solvent escaping through the paint film after the surface has skinned over. The outer surface of the coat dries and seals before the solvents underneath have fully evaporated. When those trapped solvents eventually push through, they leave pinholes. Common causes: coats applied too heavy, insufficient flash time between coats, reducer too slow for conditions, forced drying too soon (baking before solvents have flashed), or spraying over a substrate that's outgassing (like fresh body filler that wasn't fully cured).
How to fix it
If the solvent pop is in the clear coat and relatively shallow, wet sand with 1500 grit and recoat with clear. If the pinholes go through to the base coat, you'll need to sand back to the base, reshoot base, and reclear. For solvent pop in primer, sand the primer back and reapply in thinner coats with longer flash times.
How to prevent it
- Apply medium-wet coats rather than heavy wet coats. Two medium coats with proper flash time beat one thick coat every time.
- Allow full flash time between coats — don't rush. The surface should be uniformly matte/dry before applying the next coat.
- Match reducer speed to booth temperature per the paint manufacturer's chart.
- Don't force-dry or bake until the final coat has had adequate ambient flash time.
- Make sure body filler and primer are fully cured before topcoating.
Dirt and Dust Inclusions
What it looks like
Small raised bumps — nibs — in the paint film caused by dust particles, fiber from tack cloths, booth debris, or dried paint particles landing on the wet surface. They're hard to the touch and visible as tiny specks under the clear coat.
What causes it
Contamination from the environment. Dirty booth filters, contaminated air supply, worn-out tack cloths that shed fibers, dust kicked up from the shop floor when the booth door opens, dirty paint suits, or dried paint flakes from the booth walls or exhaust system.
How to fix it
For nibs in cured clear coat, carefully nib-sand each inclusion with 2000-grit wet sandpaper wrapped around your fingertip (spot sand only the nib, not the surrounding area), then compound and polish. For heavy contamination across the panel, wet sand the entire surface starting at 1500 or 2000 grit and work through your normal polish progression.
How to prevent it
- Replace booth intake and exhaust filters on schedule — don't wait until airflow drops noticeably.
- Blow off the vehicle with clean compressed air through a water/oil separator before bringing it into the booth.
- Tack the vehicle immediately before spraying with a fresh tack cloth — light pressure only. Aggressive tacking leaves adhesive residue.
- Wear a clean paint suit and hood. Don't wear the same suit you wore during bodywork — it's loaded with filler dust and sanding debris.
- Keep the booth door closed during and after spraying. Every time the door opens, shop air (and shop dust) enters the booth.
Color Mismatch and Mottling (Metallics and Pearls)
What it looks like
The repaired panel doesn't match the adjacent panels — it's too light, too dark, or has a different flop (the way the color shifts when viewed from different angles). Mottling appears as blotchy, uneven patches in metallic or pearl colors where the metallic flake isn't lying uniformly.
What causes it
Uneven application technique, wrong gun settings, or incorrect orientation of metallic flake in the paint film. Metallic colors are particularly sensitive to spray distance, air pressure, and coat wetness. Too much pressure blows the flake flat (lighter face, darker flop). Too little pressure lets the flake stand up randomly (mottling). Inconsistent gun distance across the panel creates visible light/dark zones.
How to fix it
For mottling, apply a light mist coat (also called an orientation or drop coat) — reduce the material 150–200%, lower your air pressure slightly, and spray from 12–14 inches. This ultra-thin coat allows the metallic flake to settle uniformly without moving the flake that's already down. For color mismatch, blend into adjacent panels — don't try to match panel-to-panel with a hard edge.
How to prevent it
- Keep spray distance, speed, and overlap absolutely consistent across the panel — metallics punish inconsistency.
- Spray a test card first using the same gun settings you'll use on the vehicle. Compare the test card to the car under daylight, fluorescent, and LED lighting before committing.
- Always plan to blend metallic and pearl colors into adjacent panels rather than stopping at panel edges.
Lifting and Wrinkling
What it looks like
The fresh paint coat wrinkles, shrivels, or lifts off the surface — the existing finish underneath bubbles up and separates. It looks like the surface is being attacked by the new paint.
What causes it
Chemical incompatibility. The solvents in the new paint are attacking and dissolving the previous coating. This commonly happens when spraying lacquer-based products over enamel, applying fresh paint over an undercooked previous coat, or topcoating over a substrate that wasn't properly sealed. It can also occur when a hot (aggressive) reducer or hardener penetrates the existing finish.
How to fix it
Stop spraying immediately. Let everything cure. Sand off the affected material down to a stable layer — sometimes that means going back to bare metal. Apply a sealer coat to isolate the substrate, then rebuild from there. There's no shortcut here — you have to remove the failed material and start fresh on that area.
How to prevent it
- Always apply a sealer over unknown or questionable substrates. If you're not 100% sure what's underneath, seal it.
- Test a small inconspicuous area first when recoating unfamiliar or aftermarket finishes.
- Ensure previous coats are fully cured before topcoating.
- Use the paint manufacturer's recommended sealer as a barrier coat when switching paint systems.
Mapping (Sand Scratch Swelling)
What it looks like
Visible lines or patterns in the finished paint that mirror the sanding scratches from your prep work. They may not be visible immediately after painting but appear hours or days later as the topcoat shrinks into the scratches during final cure.
What causes it
Sanding scratches in the substrate are too coarse for the topcoat system to fill and hide. The paint initially bridges over the scratches, but as solvents evaporate and the film shrinks, it sinks into the scratch pattern and telegraphs through. Using 180-grit under a basecoat that needs 320 is a classic example.
How to fix it
If mapping is visible in the clear coat, you'll need to sand back to the primer, re-sand the primer with the correct grit (320–400 for most basecoat systems), and reshoot. There's no way to buff out mapping — it's a substrate issue, not a surface issue.
How to prevent it
- Follow the paint manufacturer's recommended grit progression — never skip more than one grit step.
- Sand primer to 320–400 grit minimum before base coat. Metallics and dark solid colors show mapping more readily and may need 400 or finer.
- Use guide coat over primer to verify all scratches from the previous grit have been fully removed before moving to the next step.
- Allow primer to fully cure before sanding — undercured primer sands smooth but swells later and opens up scratch lines.
Products Mentioned
- 3M Perfect-It Rubbing Compound
- 3M Perfect-It Machine Polish
- 3M Trizact Finishing Discs
- 3M Wetordry Sandpaper
- SEM Fish Eye Eliminator
- Meguiar's Polishing Products
Shop our full selection of buffing and polishing supplies, abrasives, and SEM products at RDI.
Back to Pro Tips


